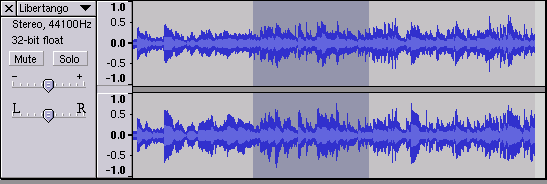


This is the waveform display part of the track, although it is also possible to display a spectrogram instead of a waveform here.
This image shows a stereo track, which is a group of two tracks - the
top one is for the left channel, and the bottom one is for the right
channel. If you need to edit the two channels as separate tracks,
you can split them using the Track Pop-Down Menu.

The track Control Panel appears directly to the left of every track. Clicking in the label outside of one of its buttons or controls selects the entire track. Shift-clicking a track label adds or removes that track from the selection. Also, clicking and dragging a track label is one way to rearrange the order of tracks.
At the top-right of the label is the close box. Click here to delete the track (though you can Undo this operation).
To the right of the close box is the track's title. Clicking on the title brings up Track Pop-Down Menu, allowing you to rearrange tracks and change various track options:
The next line in the label tells you the channel of the track (left, right, mono, or stereo) and the sample rate (e.g. 44100 Hz is the audio CD rate). Beneath that is the quality - 32-bit float is high quality but takes up more disk space, and 16-bit is the same quality as an audio CD.
The Mute button stops this track from playing. The Solo button plays only this track (or other solo tracks) and overrides the Mute button. Muting and soloing doesn't affect mixing or exporting, just playback within Audacity.
The top slider is the gain control - it affects the relative volume of the track. By default it only lets you select multiples of 3 dB, but if you hold down shift you can choose any level. Be careful not to set it too high, or you can exceed the maximum volume of a track, which results in clipping.
The bottom slider is the pan control - it affects the balance between the left and right speakers.
![]()
The Vertical Ruler is a guide to the levels you see in the waveforms. A level of 1.0 or -1.0 is the maximum supported by the audio file - anything beyond these levels will be clipped, which can sound like distortion.
When the mouse is over the vertical ruler, it changes to a magnifying glass. By clicking, you can zoom in vertically, and by shift-clicking (or right-clicking) you can zoom back out. You can zoom out as much as a factor of 2, which can be useful for editing envelopes.
When zooming vertically, Audacity will automatically "snap" to the normal range of -1...1 when you get close. If you are having trouble resetting the vertical ruler, shift-click a bunch of times until the range is -2...2, then click once to zoom back to -1...1.
If you change the display on the Track Pop-Down menu then the units of the vertical scale will change to reflect this.